Desserts
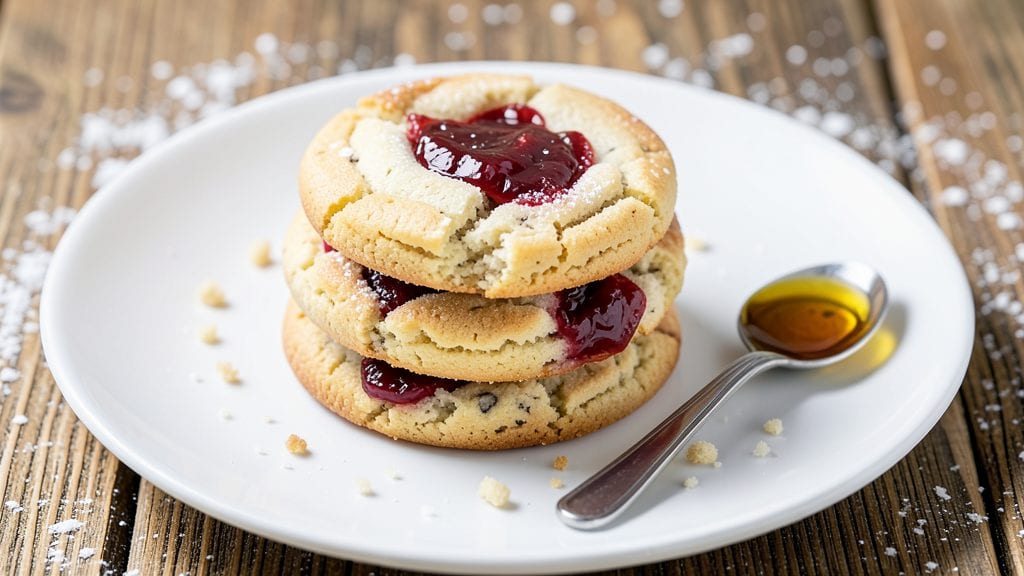
This jam heart cookies recipe delivers the perfect balance of tender vanilla swirls and pressed crunch that makes them irresistible during the holidays. 💫 The secret lies in using a high-quality vanilla bean paste and carefully applied jam filling that stays vibrant after baking.
These cookies have become a holiday staple in my kitchen, offering both visual appeal and delicious flavor.
What sets these apart is the combination of a buttery, vanilla-infused dough with a jam filling that creates a festive heart shape. The dough is rolled thin, ensuring a delicate texture while maintaining structure, and the jam filling adds a burst of fruity flavor that pairs beautifully with the vanilla.
This recipe is designed to be foolproof, with clear instructions for shaping and baking that guarantee perfect results every time.
By the time you pull these cookies from the oven, you'll have golden, heart-shaped treats with a tender center and slightly crisp edges. The jam filling remains bright and flavorful, offering a delightful contrast to the vanilla dough.
These cookies are perfect for holiday gatherings, gift-giving, or simply treating yourself to a little festive indulgence.
For added decoration, you can dust them with powdered sugar or sprinkle them with colored sugar for a festive touch. The recipe yields about 24 cookies, making them ideal for sharing or enjoying as a special dessert. Let's get baking!
Ingredients for jam heart cookies
Buttery vanilla dough meets vibrant jam filling for cookies that scream holiday magic.
| Ingredient | Amount | Notes |
|---|---|---|
| All-Purpose Flour 🌾 | 3 ½ cups | Sifted for light texture |
| Unsalted Butter 🧈 | 1 cup | Cold, cubed for creaming |
| Granulated Sugar 🍚 | 1 cup | White for classic sweetness |
| Vanilla Bean Paste 🌿 | 2 tbsp | High-quality for rich flavor |
| Large Eggs 🥚 | 2 whole | Room temperature for blending |
| Baking Powder 🧂 | 1 tsp | For lift and structure |
| Salt 🧂 | ½ tsp | Fine sea salt preferred |
| Raspberry Jam 🍓 | 1 cup | Seedless for clean filling |
| Powdered Sugar 🍚 | ½ cup | For dusting finished cookies |
| Red Colored Sugar 🎀 | ¼ cup | For festive heart decoration |
| Vanilla Extract 🌿 | 1 tsp | Pure extract for depth |
| Cornstarch 🌾 | 2 tbsp | For jam stability in filling |
The vanilla bean paste is non-negotiable here—look for brands like Nielsen-Massey or Madagascar Bourbon at specialty stores. If you can't find it, pure vanilla extract plus a scraped vanilla bean works in a pinch, but it won't be quite the same. The jam? Seedless raspberry is ideal, but strawberry or apricot jam will work too. I always buy Smucker's or Bonne Maman for consistent quality. For the colored sugar, Trader Joe's has the best selection and it's perfect for dusting those heart shapes. The flour? King Arthur or Gold Medal brands give the best texture—don't skimp on this one.
No vanilla bean paste? Double the vanilla extract and add a teaspoon of vanilla sugar for depth. Short on raspberry jam? Strawberry or apricot jam works beautifully—just add a pinch of lemon zest to brighten the flavor. If you're feeling fancy, mix jam with a teaspoon of cornstarch to thicken it slightly before piping. For the dough, if you don't have powdered sugar for dusting, a light coating of granulated sugar will do in a pinch. And if you're worried about the dough being too sticky, chill it for 30 minutes before rolling—trust me on this.
These cookies keep beautifully—3-4 days in an airtight container at room temperature, or up to 2 weeks in the freezer. I like to wrap them individually in parchment paper before freezing so they don't stick. For a festive touch, dust with powdered sugar right after baking while they're still warm. The jam filling stays vibrant for about 5 days if stored properly, so make a double batch if you're gifting these. They reheat beautifully too—just 10 seconds in the microwave brings back that fresh-from-the-oven warmth.
Why You'll Love This Recipe
- No Fuss Dough: I swear, this dough comes together in five minutes—just cream butter and sugar, toss in eggs, and fold in flour. No standing over a mixer, no measuring cups everywhere. My hands are usually sticky, but the results? Always perfect.
- Jam-Packed Flavor: That vanilla bean paste isn’t just for show—it layers warmth into every bite, while the jam swirls through like a little edible surprise. Sweet but not cloying, with that buttery richness you crave when you’re craving something simple.
- Holiday or Snack Attack: These are my go-to for Christmas cookies, but honestly? They disappear just as fast at 3 p.m. on a Tuesday. Freeze half the batch, and you’ve got instant gifts or a last-minute dessert fix.
- Budget-Friendly Staples: Flour, butter, sugar—these are pantry basics that won’t break the bank. A single vanilla bean (or paste) stretches across multiple batches, and the jam adds that "special occasion" touch without the fancy price tag.
Step-by-step instructions for jam heart cookies
Here's how to create these magical cookies with perfect swirls and crunchy hearts!
👨🍳 Step 1: Make the Jam Filling
In a small saucepan, combine the 1 cup Raspberry Jam with the 2 tbsp Cornstarch and 1 tsp Vanilla Extract. Stir over medium heat until the mixture thickens enough to coat the back of a spoon—about 3-5 minutes. You'll know it's ready when it pulls away from the sides and forms a glossy coating.
Let the filling cool completely before using—this prevents the jam from melting when you add it to the dough. I like to spread it on parchment paper and chill for 15 minutes while I prepare the cookie dough. This step is crucial for maintaining those beautiful jam swirls in your finished cookies!
👨🍳 Step 2: Cream Butter and Sugars
In a stand mixer fitted with the paddle attachment, beat the 1 cup Unsalted Butter (cold, cubed) with the 1 cup Granulated Sugar on medium speed for 3-4 minutes. The mixture should lighten in color and become fluffy—this incorporates air that creates those perfect crackly tops.
Add the 2 tbsp Vanilla Bean Paste and 1 tsp Vanilla Extract, mixing for another 30 seconds until fully combined. Here's where it gets fun—you'll see the vanilla bean paste swirl into the butter, creating beautiful marbled patterns. This step makes all the difference for that authentic vanilla flavor!
👨🍳 Step 3: Add Eggs and Dry Ingredients
Add the 2 whole Large Eggs one at a time, mixing on low speed for 30 seconds after each addition. Then, in a separate bowl, whisk together the 3.5 cups All-Purpose Flour, 1 tsp Baking Powder, and 0.5 tsp Salt. Gradually add the dry ingredients to the wet mixture, mixing on low speed until just combined.
Don't overmix—you should still see some flour streaks. The dough will be slightly sticky, which is perfect for creating those beautiful jam swirls. Here's a pro tip: if the dough feels too sticky, chill it for 10 minutes before proceeding. This makes handling much easier!
🥘 Step 4: Shape and Fill the Cookies
Preheat your oven to 350°F and line two baking sheets with parchment paper. Divide the dough into 24 equal portions (about 1.5 ounces each) and roll each into a 1-inch thick ball. Press a 1-inch deep well into the center of each ball using your thumb.
Fill each well with about 1 teaspoon of the cooled jam mixture, then seal the dough around the jam. Roll the filled dough into a 1.5-inch diameter ball and place it on the prepared baking sheets, spacing them 2 inches apart. Sprinkle each cookie with a pinch of 0.25 cup Red Colored Sugar to create that festive heart pattern!
🔥 Step 5: Bake to Golden Perfection
Bake the cookies for 12-14 minutes until the edges are golden brown and the centers look slightly underdone. They'll continue cooking on the hot pan after you remove them from the oven. Watch closely—the jam filling should be warm but not melted through.
Let the cookies cool on the baking sheet for 5 minutes before transferring to a wire rack. While still warm, dust the tops with 0.5 cup Powdered Sugar for that classic finishing touch. These cookies are best enjoyed fresh from the oven—each bite delivers that perfect balance of buttery dough, fruity jam, and crunchy sugar hearts!
Pro Tips For Making Jam Heart Cookies
- Cream Butter Properly: Use a stand mixer or wooden spoon to beat the butter and sugar until it’s pale and almost fluffy—about 3-4 minutes. I learned this the hard way: under-creaming means dense cookies, and over-creaming just makes you wait longer. Stop when the mixture looks like wet sand, not wet cement.
- Chill the Dough: Wrap the dough in plastic and refrigerate for at least 2 hours, or up to 48 hours. Cold dough spreads less, holds its shape, and develops better flavor. I used to skip this, and my jam hearts always turned into sad, flat pancakes—no one wants that.
- Don’t Overfill the Scoop: Use a cookie scoop that holds about 1.5 tablespoons of dough—pack it lightly, like you’re making a snowball. Overfilling leads to messy, uneven cookies that spread too much. Trust me, your future self will thank you when the jam hearts stay plump and pretty.
- Bake in Batches: Preheat the oven to 350°F (175°C) and bake one tray at a time, spacing cookies 2 inches apart. Crowding them makes them puff up unevenly and bake unevenly—no one wants a batch where some are golden and others are doughy. Yes, it takes longer, but it’s worth it.
Make-ahead tips for jam heart cookies
Dough Prep Ahead
Make the dough up to 2 days in advance and store it in an airtight container lined with plastic wrap at room temperature. The flavors meld beautifully overnight, and the dough becomes easier to handle.
I like to chill it for 30 minutes before shaping to prevent sticking—this is especially helpful if your kitchen is warm. 💫
Jam Filling Prep
Prepare the jam filling the day before and store it in a small glass jar with a tight-sealing lid in the refrigerator. The cornstarch helps it stay stable, but the filling will thicken slightly—just stir before using.
I often make a double batch to have extra for gifts or second baking sessions. The filling stays vibrant for 5 days this way.
Shaping Efficiency
Divide the dough into 24 equal portions using a kitchen scale for precision—each should weigh about 1.5 ounces. Roll them into balls and place them on a tray lined with parchment paper.
Cover with a damp towel and refrigerate for 1 hour before shaping to prevent spreading. This step saves time during baking day and ensures consistent sizes.
Baking in Batches
Bake only 12 cookies at a time on each sheet to allow proper airflow and even browning. Rotate the pans halfway through baking for even heat distribution. I use the middle rack in my oven for consistent results.
If you're short on time, bake the second batch immediately after the first comes out—this keeps the oven hot and maintains baking efficiency. 🔥
Storage Secrets
Store baked cookies in a single layer in an airtight container with parchment paper between layers to prevent sticking. They stay fresh for 3-4 days at room temperature or up to 2 weeks in the freezer.
For a festive touch, wrap individual cookies in colored parchment paper before gifting—it keeps them looking fresh and adds a special presentation.
Reheating Tips
For that fresh-from-the-oven experience, reheat cookies at 300°F for 3-5 minutes until warmed through. Microwave reheating works too—just 10 seconds on high power softens the jam filling without drying out the dough. I avoid the microwave for long reheats because it can make the sugar coating too sticky. 💡
Nutrition facts
Frequently asked questions
Why does my jam filling leak out when baking?
The filling may leak if it's too warm when added to the dough or if the dough isn't properly sealed around it. Always chill the jam mixture for 15 minutes before using, and press the dough firmly around the filling to create a tight seal. If the jam is too runny, mix in an extra 1 teaspoon of cornstarch to thicken it before baking.
Can I use store-bought vanilla cookies as a shortcut?
While you can use store-bought vanilla cookies, they won't have the same rich flavor or texture as homemade dough. If you're short on time, try using a high-quality vanilla sugar cookie dough from the refrigerated section of your grocery store. Just be sure to adjust the jam filling amount to 1/2 teaspoon per cookie since store-bought dough is often thicker.
What's the best way to make these cookies gluten-free?
Replace the all-purpose flour with a 1:1 gluten-free baking flour blend like Bob's Red Mill or King Arthur. Add an extra 1/4 teaspoon of xanthan gum to help bind the dough. For the jam filling, ensure your jam is naturally gluten-free (some brands add thickeners with gluten). The texture will be slightly different but still delicious!
How do I prevent the cookies from spreading too much?
Chill the shaped cookies for 1 hour before baking to firm up the dough. Use a kitchen scale to divide the dough into 1.5-ounce portions for consistent size. Bake at 350°F for 12-14 minutes—don't overbake, or they'll spread further. A lightly greased baking sheet also helps prevent sticking and spreading.
Can I make these without a stand mixer?
Cream the butter and sugar by hand using a wooden spoon or fork in a large bowl. Mix vigorously for 5-7 minutes until light and fluffy. For the eggs and dry ingredients, use a spatula to fold everything together gently. The dough will be slightly less aerated but still delicious. Just be prepared for a bit more elbow grease!