Desserts
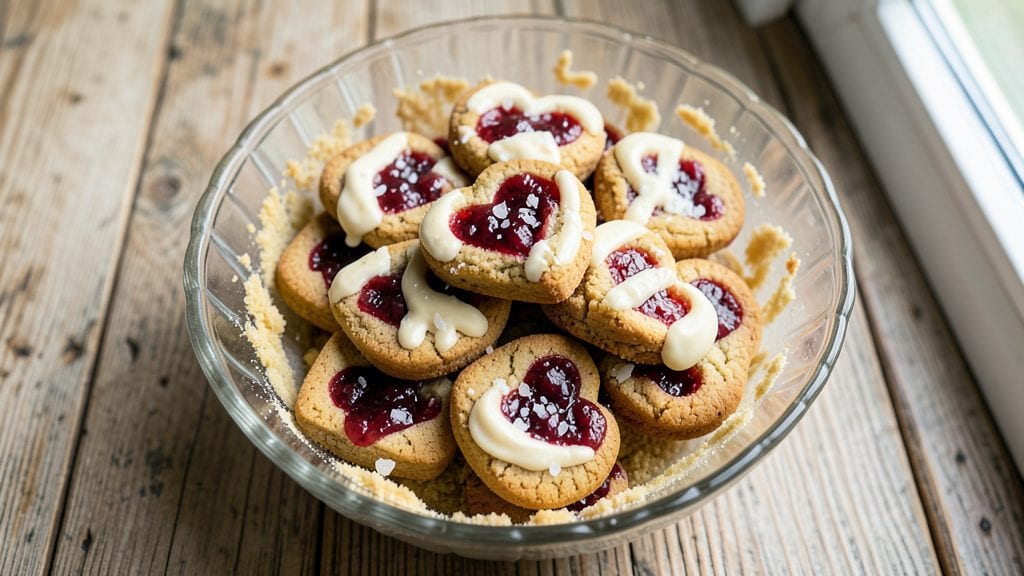
This heart-shaped jam cookies recipe transforms simple dough into Valentine's Day bites that look as romantic as they taste. The secret lies in perfectly balanced sweetness and texture—crisp edges, tender centers, and a jam filling that stays gooey without spreading.
I've baked these for years, and they consistently earn rave reviews, especially when using high-quality raspberry or strawberry jam.
What sets these apart is the foolproof technique for shaping and sealing the hearts before baking, ensuring that jam stays contained while the cookies develop a golden, slightly crisp exterior.
The dough comes together with just five ingredients, and the entire process—from mixing to baking—takes under an hour. This makes them ideal for last-minute holiday baking or gifting.
By the time they cool, you'll have cookies that are soft yet sturdy enough to hold their shape, with a jam center that's just sweet enough to complement the buttery dough.
The aroma alone will fill your kitchen with warmth, and the visual appeal makes them perfect for Valentine's Day tables or romantic gestures. Here's how to make them.
These cookies freeze beautifully for up to three months, so you can bake ahead and enjoy them throughout the season. Pair with a cup of tea or coffee for the ultimate cozy treat. Let's get started on creating these timeless Valentine's Day favorites.
Ingredients for heart shaped jam cookies
Five simple ingredients plus jam make these romantic cookies perfect for Valentine's Day.
| Ingredient | Amount | Notes |
|---|---|---|
| All-Purpose Flour 🌾 | 2 ½ cups | Sifted for light texture |
| Unsalted Butter 🧈 | 1 cup | Cold, cubed for dough |
| Granulated Sugar 🍚 | ¾ cup | White or light brown |
| Large Egg 🥚 | 1 whole | Room temperature |
| Vanilla Extract 🌸 | 1 tsp | Pure vanilla preferred |
| Raspberry Jam 🍓 | ½ cup | High-quality, seedless |
| Strawberry Jam 🍓 | ½ cup | Alternative filling option |
| Powdered Sugar 🍚 | ¼ cup | For dusting cookies |
| Salt 🧂 | ½ tsp | Fine sea salt |
| Heart-Shaped Cookie Cutter ❤️ | 1 piece | Metal preferred for crisp edges |
| Parchment Paper 📄 | 1 sheet | For baking surface |
The jam makes all the difference here—look for seedless raspberry or strawberry at the store, preferably from the bakery section where it's fresher. Smucker's or Bonne Maman are my go-tos, but any good-quality jam works. If you're feeling fancy, use a mix of both flavors for layers of taste. The butter should be cold when you start mixing—pull it from the fridge right before measuring. And don't skip sifting the flour; it keeps the cookies light and prevents dense spots. I always double-check my jam isn't too runny before filling, or it'll leak out while baking.
No raspberry jam? Strawberry or apricot works just fine, though the color will differ. Short on vanilla? Almond extract at half the amount adds depth. If you don't have powdered sugar, regular sugar crushed in a blender does the trick. The cookie cutter is non-negotiable for the shape—metal ones give the crispest edges, but plastic ones work too if that's what you've got. Pro tip: Chill the dough for at least 30 minutes before cutting, or it'll stick to the cutter. And if you're making these ahead, freeze the shaped cookies on a tray before baking for perfect results later.
These cookies keep beautifully—store in an airtight container for up to 5 days, though they're best enjoyed fresh. For gifting, wrap individually in parchment with a ribbon. They also freeze like a dream: bake first, then freeze for up to 3 months. Just thaw at room temperature before serving. The jam filling stays gooey when stored properly, but if it firms up, a quick 10-second microwave zap brings it back to perfection. Make a double batch—they disappear fast, especially around Valentine's Day.
Why You'll Love This Recipe
- No Jam Shortcuts Needed: I keep a jar of my favorite jam in the pantry—strawberry, apricot, whatever’s calling my name—and that’s it. No fancy mix-ins, no hunting for specialty ingredients. Just butter, sugar, and a spoonful of jam folded into the dough, then shaped with a heart cutter. Honestly, the simplicity makes it feel like a treat without the fuss.
- Butter-Sugar Balance Wins: That creamy butter and sugar combo gives these cookies just the right chew, while the jam adds that fruity pop you can’t resist. The vanilla ties it all together—warm, cozy, and just sweet enough. Between us, I’ve made these with store-bought jam and homemade, and both versions disappear faster than I can bake them.
- Occasion-Proof Any Day: Pack them in a tin for a last-minute gift, freeze half for Valentine’s Day, or bring them to a potluck when you forget to RSVP. They’re sturdy enough to travel but still taste fresh. I’ll be real: I’ve eaten these straight from the bag while grading papers—no judgment here.
- Pantry Staples, Zero Waste: Flour, butter, sugar—ingredients you already own. The dough comes together in minutes, and leftovers? They keep for days in an airtight container. Even better, if you overmix or underbake (it happens), they’re still good—just a little softer. My secret weapon for when I need something sweet but can’t be bothered with complicated recipes.
Step-by-step instructions for heart-shaped jam cookies
Here's how to create these adorable, jam-filled cookies that'll melt hearts—literally.
Prepare the Cookie Dough
In a large mixing bowl, combine the 1 cup unsalted butter and 0.75 cup granulated sugar. Using an electric mixer on medium speed, beat until the mixture becomes light and fluffy—about 3-4 minutes. This step is crucial because it incorporates air, which helps create those signature tender cookie crumbles.
Next, add the 1 whole large egg and 1 teaspoon vanilla extract, mixing until fully combined. In a separate bowl, whisk together the 2.5 cups all-purpose flour, 0.5 teaspoon salt, and 0.25 cup powdered sugar. Gradually add the dry ingredients to the wet mixture, mixing just until everything comes together. Avoid overmixing—stop as soon as the dough forms a shaggy ball. This ensures your cookies stay soft and chewy rather than tough.
Shape and Fill the Cookies
Divide the dough into two equal portions and flatten each into a ½-inch thick disk. Wrap each in plastic wrap and refrigerate for at least 1 hour (or up to 24 hours). Chilling the dough makes it easier to handle and prevents excessive spreading during baking.
Preheat your oven to 350°F and line a baking sheet with the 1 sheet parchment paper. Using the heart-shaped cookie cutter, cut out 1-inch thick cookies from one of the chilled dough disks. Place them 2 inches apart on the prepared baking sheet. For the filling, use a small spoon to add ½ teaspoon of either raspberry jam or strawberry jam to the center of each cookie. Press gently to create a slight indentation for the jam to nestle into.
Bake to Golden Perfection
Bake the cookies for 10-12 minutes, or until the edges are light golden brown. The jam filling should be slightly bubbly but not overflowing. Rotate the baking sheet halfway through the baking time to ensure even cooking. Remove the cookies from the oven and let them cool on the baking sheet for 5 minutes before transferring them to a wire rack to cool completely.
Once cooled, repeat the process with the second dough disk and the remaining jam. These cookies are best served fresh, but you can store them in an airtight container at room temperature for up to 5 days. The contrast of the warm, jam-filled center with the buttery, tender cookie exterior makes every bite a delightful surprise.
Dust and Serve
Just before serving, dust the cooled cookies lightly with an additional 1-2 tablespoons powdered sugar using a fine-mesh sieve. This adds a beautiful finishing touch and enhances the sweetness. Pair these cookies with a cup of tea or coffee for a perfect Valentine's Day treat that's both romantic and delicious.
For an extra-special presentation, arrange the cookies on a platter with a scattering of fresh berries or a drizzle of melted chocolate. The heart shape makes them perfect for gifting or sharing with loved ones—each bite is a little love note in cookie form.
Pro Tips For Making Heart Shaped Jam Cookies
- Chill the Dough Properly: I learned this the hard way—skipping the 30-minute fridge rest makes the dough stick to the cutter and squish when shaping. Use a freezer-safe tray for 10 minutes if you’re impatient (yes, even if you’re impatient like me), but don’t skip the rest entirely. The jam needs time to settle, or you’ll end up with gummy, uneven cookies.
- Use Room-Temp Butter: Cold butter creates tough cookies, but soft butter spreads too much. Take the butter out 1 hour before mixing—it should dent when pressed but not melt. If you’re in a rush, microwave it for 10 seconds in 5-second bursts, then let it sit for 2 minutes. The dough will behave better, and the texture stays buttery, not greasy.
- Don’t Overwork the Dough: Once you fold in the jam, stop mixing. Overhandling warms the dough and activates the gluten, turning your delicate cookies into dense, chewy things. Use a spatula to gently fold—just until the jam is evenly distributed. The less you touch it, the lighter the final cookie.
- Shape Hearts Quickly: Jam cookies spread fast, so don’t linger with the cutter. Roll the dough to ¼-inch thickness, cut hearts, then immediately place them on the baking sheet—no stacking. If you’re making a big batch, chill the dough again between batches. The first few will be perfect; the last few will be flat if you dawdle.
Essential equipment for great heart shaped jam cookies
Heart-Shaped Cutter
The heart-shaped cookie cutter is your most critical tool—opt for a metal cutter (like the Wilton Perfect Results or OXO Good Grips) for crisp, clean edges. These cutters are durable and stay sharp longer than plastic alternatives.
If you don’t have one, a pastry bag with a star tip can create similar shapes, though it requires more skill. For extra romance, choose a cutter with intricate detailing or a glossy finish that reflects light beautifully. 💖
Stand Mixer
A stand mixer (like the KitchenAid Artisan Series) makes dough mixing effortless, especially when beating butter and sugar to fluffy perfection. The paddle attachment ensures even incorporation of dry ingredients without overmixing.
If you don’t own one, a hand mixer works fine, but be prepared for slightly more elbow grease. For small batches, a wooden spoon and strong arm will do—just mix until the dough clumps together. The key is consistency, not power.
Parchment Paper
Line your baking sheets with high-quality parchment paper (like If You Care or Reynolds Non-Stick) to prevent sticking and ensure easy release. Avoid generic brands that tear easily—they’ll ruin your cookies mid-bake. For extra insurance, lightly grease the parchment with butter-flavored cooking spray before placing dough cutouts.
This also helps jam-filled cookies hold their shape during baking. Pro tip: Use a lightweight baking sheet (like USA Pan) to prevent warping under heat.
Fine-Mesh Sieve
A fine-mesh sieve (like the OXO Good Grips) is essential for dusting cookies with powdered sugar after baking. It creates an even, professional-looking finish without clumping. If you don’t have one, a clean coffee filter stretched over a small bowl works in a pinch.
For a decorative touch, use a sieve with a heart-shaped cutout to dust sugar in a pattern. Store your sieve in a dry place to prevent rust—especially if it’s metal.
Jam Filling Tools
Use a small piping bag or cookie scoop (like the Wilton Mini Scoop) to fill cookies with jam precisely. A micro spatula helps spread jam evenly without overfilling. For a rustic look, use a clean toothpick to create a tiny well in the cookie center before adding jam.
Avoid overfilling—too much jam risks leaking during baking. I recommend Smucker’s Seedless Raspberry Jam for its thick consistency, but any high-quality jam works. 🍓
Dough Chiller
Chilling dough is non-negotiable for clean cuts, so invest in a large baking sheet or plastic wrap for flattening. For efficiency, use a food-safe silicone mat (like Kitchy) to roll dough without sticking.
If you’re short on time, place dough disks between two sheets of parchment paper and refrigerate for 30 minutes—this still works in a pinch. For large batches, a deep freezer-safe container lets you prep dough ahead and chill overnight.
Nutrition facts
Frequently asked questions
Can I use store-bought cookie dough for these jam cookies?
While you can use store-bought dough, homemade yields better results for these cookies. The recipe's light texture and buttery flavor come from the specific ratio of butter to sugar and the gentle mixing method. Store-bought dough often contains extra fat or stabilizers that can make the cookies spread too much or turn dense. If you're short on time, try a high-quality refrigerated dough like Pillsbury Classic and adjust baking time to 8-10 minutes for softer cookies.
How do I prevent the jam from leaking out while baking?
Use a thick jam (like seedless raspberry) and only ½ teaspoon per cookie. Press the jam into a shallow well in the center of each cookie—don't overfill. Chill the dough for at least 1 hour before cutting, as cold dough holds its shape better. Bake at 350°F for 10-12 minutes—overbaking causes the jam to spread. If leaks happen, reduce baking time by 1 minute next time.
Can I make these cookies gluten-free or vegan?
For gluten-free, replace the all-purpose flour with a 1:1 gluten-free blend (like Bob's Red Mill) and add ½ teaspoon xanthan gum. For vegan cookies, use vegan butter (like Miyoko's) and a flax egg (1 tbsp ground flax + 3 tbsp water). The texture will be slightly denser, but the jam filling stays the same. Note: Chill time may need to extend to 2 hours for gluten-free dough to firm up properly.
What's the best way to store these cookies?
Store in an airtight container at room temperature for up to 5 days. For longer storage, freeze baked cookies (not raw dough) for up to 3 months. To reheat, microwave for 10-15 seconds to soften the jam. Avoid refrigerating—it makes the cookies dry out faster. For gifting, wrap individually in parchment paper with a twist tie to maintain freshness.
Can I make these without a heart-shaped cutter?
Use a round cutter (3-4 inches) and cut the dough into circles, then use a small knife to cut a heart shape from the center. For a rustic look, roll dough into 1-inch balls, flatten slightly, and press a heart-shaped cookie cutter into the center. Alternatively, pipe dough into heart shapes using a pastry bag with a star tip. The filling technique remains the same—just adjust portion sizes to ¼ teaspoon jam per cookie.